- Difficulty level: easy
- Time need to lean: 20 minutes or less
- Key points:
- SoS works with any Jupyter kernel
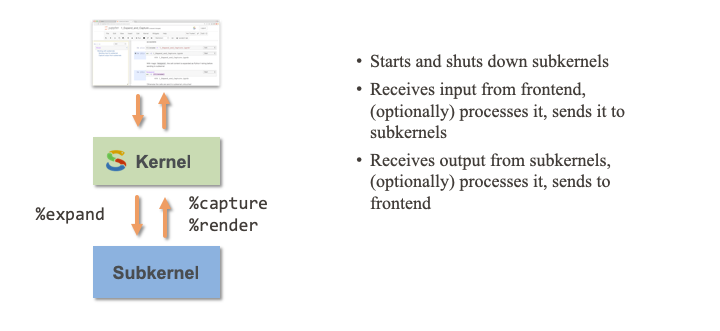
%cdchanges directory of all subkernels%expandexpands expressions in the cell input before sending it to subkernels%capturecaptures output from subkernels and save them into Python variables%renderrenders output from subkernels in different formats
A SoS kernel is a master kernel that can start, stop, and interact with any Jupyter kernel, which are called subkernels by SoS. Although most of the times SoS just passes user input to subkernels and sendes outputs from subkernels to the frontend (notebook), you can use a few SoS magics to modify user inputs before they are sent to the subkernel, and process outputs before they are sent to the frontend.
When working with multiple kernels in a notebook, it could be confusing if kernels have different working directory. The rule of thumb in SoS are as follows:
First, subkernels starts at the current working directory of the SoS kernel
Second, changing working directory in one subkernel will not affect other living kernels
Third, magic %cd changes working directory of all subkernels
Script in SoS cells are by default sent to SoS or the subkernels in verbatim. For example,
With variable par defined in the SoS kernel,
the %expand treats the content of the following cell as a Python f-string and expands expressions inside braces:
If the script contains { }, which is quite common in R, you can double the braces
If there are multiple braces, it is obviously better to use a different sigil, such as ${ } to interpolate the script
Although not the topic of this tutorial, it is worth mentioning that the usage of the %expand magic is the same as the expand option of SoS actions so that you can convert the above script that was executed in a R session to an R action in a SoS workflow as follows:
If a language module supports the expand interface (not all of them does), you can expand the content of a cell in specified kernel. This is most naturally used in a markdown kernel when the expanded text are treated as markdown text.
By default the markdown kernel processes the input text literally:
With the %expand magic, you can expand expressions with variables in SoS kernel (default).
If you have variables in R,
You can expand the content of the cell using variables (and expressions) in R:
If you are more familiar with delimiters in RMarkdown, you can specify the delimiter as option of %expand.
Magic %capture all or part of the output of a cell to a SoS variable. To understand how this magic works, you will need to understand how Jupyter works. Briefly, after a cell is executed, the kernel sends one or more of messages stream, display_data, and other controlling messages before it sends execute_result to conclude the execution. The stream message type can contain standard output (stdout) and standard error output (stderr), and the display_data message can contain a lot more complex data under a dictionary with keys text/html, text/plain, text/markdown etc, and the frontend will decide how to display these messages.
Determine what to capture
The %capture magic can capture the following types of information
| name | message |
|---|---|
stdout |
stdout of stream messages |
stderr |
stderr of stream messages |
text |
text/plain of display_data or execute_result messages |
html |
text/html of display_data or execute_result messages |
markdown |
text/markdown of display_data or execute_result messages |
error |
evalue of error message |
raw |
All above messages |
The first step to capture output from a cell is to determine what types of messages are sent by the cell. If you are uncertain, you can open the console panel (right click and select New Console for Notebook if you are using Jupyter Lab), and use the %capture magic without option (or with the raw option).
The messages that has been returned by the cell will be displayed in the console window
[('stream', {'name': 'stdout', 'text': 'I am from Bash\n'})]
for this cell, from which you can see that the message is of type stdout. You can then specify the stdout type,
The captured result is by default saved to a variable __captured in the SoS kernel:
You can use option -t (--to) to assign the name of the variable
As a more complex example, the following cell runs a SPARQL query and returns multiple messages.
The __captured variable shows all returned messages
You can then save the content of text/html to a variable html_table
which contains the text/html data of two messages
Then, if you would like to process the output programatically, you can use one of the many powerful Python modules
If the output of a cell is well-formatted, it is possible to capture the output as variables in a type other than str.
For example, if you would like to capture the size of some files from a few notebook files. Instead of using Python scripts, you could possibly use a shell command as follows
The output is well formatted so you can capture it in csv format as follows
The resulting variable is a Pandas DataFrame but unfortunately treated the first data line as header, which is not entirely correct here.
The %capture magic can capture data in text (default), json, csv, and tsv format, and can append to instead of replacing an existing variable (option -a). Please refer to the SoS Magics reference or command %capture -h for a comlete list of options.
The %render magic intercepts the output of a cell, convert it to certain format before displaying it in the notebook. The format can be any format supported by the IPython.display module and is default to Markdown.
For example, if you have a dataset
You can format it in HTML format
and render it as a HTML table.
Currently %render only renders stdout (of stream messages, default) and text (text/plain of display_data messages) contents, and you should probably use %capture raw to check the type of output before you %render.
The %render magic accepts any renderer that is defined in the IPython.display module. The following cell lists all renderers,
and of course a %render magic would treat the output as markdown format and display the items as bullet points:
The ability to render text output as markdown text alleviatea a problem with the Jupyter notebooks in that its markdown cells cannot contain variables, so you cannot really mix results with their descriptions as easily as what Rmarkdown inline expressions do. However, with the %render magic, you can write markdown text as a string in any kernel, and use the %render magic to display it.
For example, if you have res obtained from some analysis
You can report the result by generating a markdown text programmatically and use the %render magic to render it
This is less intuitive than writing down markdown text directly but you have the flexibility to generate the markdown text using any language and you can use conditions and loops to automate the output of long reports.