If you are curious on what SoS and SoS Notebook are, you can try it out by clicking this link. This will lead you to our live SoS server from which you can click New -> SoS and create a SoS Notebook with all supported languages except for two proprietary ones (MATLAB and SAS).
If you are using docker, you can run SoS directly using command
% docker run -it vatlab/sos:latest /bin/bash
to enter a command prompt with sos command. More usefully, you can start a Jupyter server with R and IRkernel, Julia, Python, and SoS kernels, and many Python and R modules for data sciencists using command
% docker run -d -p 8888:8888 vatlab/sos-notebook
After the docker is running in the background, you will need to find the URL to access the server from the output of the previous command, which can be obtained with command docker logs with the output of the previous command, e.g.
% docker logs 8ada70223a073942b1dd6a6c882189a0b3fadf902b3ad87acbe37063a198d6b8
Execute the command: jupyter notebook
...
    Copy/paste this URL into your browser when you connect for the first time,
    to login with a token:
        http://localhost:8888/?token=754a646651c82657725be887a1a2579ab69a702ba80ae4b3
You can then enter the URL in the log message to a browser and start working with a complete SoS environment. You could also set up the docker image to disable password as discussed here but using a Jupyter server without password is strongly discouraged.
You can even use this docker image for your daily data analysis if you make your local directory available to the Jupyter server using command
% docker run -d -p 8888:8888 -v $HOME:/home/jovyan/work vatlab/sos-notebook
This command mounts your home directory ($HOME) to directory work under the home directory of the docker machine but you can mount any local directory to the docker image. This container is hosted at our public Jupyter
server from which you can open our sample notebooks and create your own notebooks without installing anything.
Note: If you get an error message stating Bind for 0.0.0.0:8888 failed: port is already allocated, your local port 8888 is already taken by some other processes and you can use options such as -p 9999:8888 to use another local port. Using a different port actually allows you to execute multiple instances of the docker image.
SoS consists of two major parts, the **SoS Workflow** and **SoS Notebook**, each with a number of extension modules:
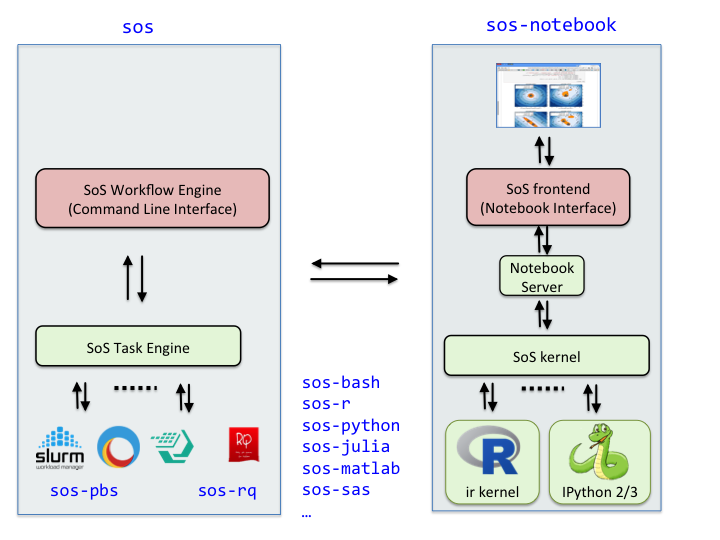
**SoS Workflow Engine **
sos: SoS workflow engine with its command line interfacesos-pbs: PBS task engine for Torch, Slurm, IBM LSF etcsos-rq: rq task engine for SoSsos-bioinfo: extension for bioinformatic applications** SoS Notebook **
sos-notebook: Core sos-notebook modulesos-papermill: Papermill extension for command line execution of SoS notebookssos-bash: SoS extension for shell scriptssos-javascript: SoS extension for JavaScript and Node.jssos-julia: SoS extension for Juliasos-lua: SoS extension for Luasos-matlab: SoS extension for MATLAB and Octavesos-python: SoS extension for Python2 and Python3sos-r: SoS extension for Rsos-sas: SoS extension for SASsos-scilab: SoS extension for Scilabsos-stata: SoS extension for StataIf you are using a conda environment, you can install sos, sos-notebook, and its language modules, and required interpreters all from a conda environment. For example, you can install SoS Workflow with command
conda install sos sos-pbs -c conda-forge
and SoS Notebook with command
conda install sos-notebook jupyterlab-sos sos-papermill -c conda-forge
Here jupyterlab-sos is JupyterLab extension for SoS Notebook, and sos-papermill is a Papermill extension for running SoS notebooks in command line.
You can install language modules with commands such as
conda install sos-r sos-python sos-bash -c conda-forge
Note that conda strives to provide complete environments for you so
conda install sos-r -c conda-forge
will install sos, sos-notebook, the language module sos-r, and a complete R environment including r-base and r-irkernel, and required python module feather-format and R library feather.
Similarly,
conda install sos-bash -c conda-forge
will install sos, sos-notebook, the language module sos-bash, bash if under Linux or MacOSX, and m2-bash if under windows.
If you would like to have the flexibility to use system R (or bash etc), you can install sos-notebook, its language modules and required libraries separately using pip.
SoS supports Linux, Mac OSX, and Windows systems and requires Python 3 (version 3.6 or later) so you will need to install Python 3 if you do not have it installed locally. We recommend anaconda Python because it is a complete Python environment with many packages for scientific computing.
If you only need to use the command line interface of the SoS Workflow System (e.g. to execute workflows on a remote server), you can install it with command
pip install sos
If you need to submit PBS (Slurm, PBS, LSF, etc) jobs to a cluster system, you will need to install the sos-pbs module, using command
pip install sos-pbs
If you are using vim, you can use command
python -m sos.install
to install a vim extension of sos to enable syntax highlighting when editing .sos files.
SoS Notebook can be used as both a polyglot notebook and an IDE for the SoS workflow system. It should be installed locally, or on a server to which you access remotely with a browser.
After making sure that you have Python 3.6+ installed, you can install sos-notebook and extension modules with commands such as
pip install sos-notebook
pip install sos-papermill
pip install sos-r
After the installation of sos-notebook, you will need to register the sos kernel to Jupyter using command
python -m sos_notebook.install
After verifying the sos and the kernels you would like to use are in the output of
jupyter kernelspec list
you can start a Jupyter server with command
jupyter notebook
and choose SoS as the kernel for a new notebook. Please refer to Notebook Interface of the SoS documentation for details.
Certain features of SoS Notebook require optional python modules. They are not required but recommended for a complete SoS environment. These modules include
JupyterLab is the next-generation web-based user interface for Project Jupyter. To use SoS with JupyterLab, you will need to install SoS Notebook (the sos kernel) and all language modules and supporting libraries, then install the JupyterLab extension of SoS called jupyterlab-sos following instructions here. Basically, you can
install transient-display-data and jupyterlab-sos extensions from the JupyterLab extension manager
or from conda using command
conda install jupyterlab-sos -c conda-forge
if you are using a conda environment
or from command line using commands
jupyter labextension install transient-display-data
jupyter labextension install jupyterlab-sos
To use a language in SoS, your system should have the corresponding interpreters (bash, python, julia) and Jupyter kernel (e.g. ir for R, ijavascript for JavaScript) installed. The installation process varies from language to language, and can be quite troublesome depending on language and operating system.
If you are using conda, commands such as conda install sos-r -c conda-forge will install all needed modules. Otherwise, you should
julia to check if julia is installed.jupyter kernelspec list
bash is generally available under Linux and MacOSX so you only need to install the Bash Kernel or Calysto Bash kernel for Jupyter.
If you are using windows, you can install m2-bash or git-bash. Since the Bash Kernel does not support windows, Calysto Bash kernel would be the only choice for this system.
Although there appears to be several Jupyter Kernels, SoS is only tested with the iJavaScript kernel. To use this kernel, please follow iJavaScript kernel homepage to install iJavaScript kernel.
Start Julia and install iJulia by following iJulia Kernel homepage. After that, install feather.jl, DataFrames.jl and NamedArrays.jl with commands
using Pkg
Pkg.add("Feather")
Pkg.add("DataFrames")
Pkg.add("NamedArrays")
Note that it is important to set
ENV["JUPYTER"] = "/path/to/jupyter"
in Julia before running
Pkg.add("IJulia")
so that IJulia can be installed to the existing installation of Jupyter.
Finally on the SoS side, the Python feather-format module should be installed, most likely with command
conda install -c conda-forge feather-format
to facilitate the exchange of data frames, and please do not forget to install the Julia language module
pip install sos-julia
Because SoS requires Python 3.6 and only MATLAB version 2017b+ supports this version of Python, you will need to have a working version of MATLAB 2017b or later installed on your system. Then, you will need to install matlab engine for Python, which
typically involves the execution of command python setup.py install under matlabroot\extern\engines\python.
Because of a bug with usage statistics collection in MATLAB 2017b, you will need to turn off MATLAB's usage statistics collection system before you use MATLAB 2017b with SoS. To resolve this issue, You can opt-out of usage statistics collection by using the following steps: On the Home tab, in the Environment section, click Preferences, then select MATLAB > General in the Preferences window. Uncheck the box Improve MATLAB by sending user experience information to MathWorks.
There are two different implementations of MATLAB kernels for Jupyter matlab_kernel and imatlab. Because of a bug with matlab_kernel, you should install the imatlab kernel by following instructions on the imatlab homepage.
Because MATLAB is among the most difficult languages to configure, we have recorded a video Using MATLAB with SoS Notebook with detailed instructions on how to configure SoS Notebook to work with MATLAB.
After installing octave, install the octave kernel by following instructions on the octave kernel homepage.
For transferring Python's DataFrame and its equivalences in other languages, you will need to install the dataframe package using the following command:
octave --eval 'pkg install -forge dataframe'
If you still have Python 2.x installed on your system and would like to use it with SoS, you will need to
python2 or python2.7 in your $PATH and use action python2 for python2 scripts.Jupyter comes with working Python3 kernel so no further installation is needed.
To use R with SoS, you will need to install the following components:
conda install -c conda-forge pyarrow
If you have a working R installation, you can install irkernel and arrow in R with commands
install.packages('IRkernel')
IRkernel::installspec()
install.packages('arrow')
If you are using anaconda and do not have R installed, you can install R and required packages using commands
conda install -c r r-essentials r-arrow
conda install -c conda-forge pyarrow
To use Ruby with SoS, you will need to install iRuby by following iRuby Kernel homepage. After that, install daru and NMatrix with command:
gem install daru nmatrix
With a local or remote SAS installation of version 9.4 or higher, you will need to install sas-kernel and configure it to connect it to your SAS installation.
Note:
sas_kernel.Note for Windows Users:
classpath in sascfg.py (sascfg_personal.py) might need to be updated manually.SAS_config_names to a list only containing one option that you want to use. You cannot choose the SAS_config_names in sos_notebook. For example, if winlocal is your choice, then simply change the code to SAS_config_names = ['winlocal'].You will need to install Scilab and then the scilab_kernel.
You will need to install Stata and then the stata_kernel.
After installing npm, typescript, you should install the iTypeScript kernel.
zsh is generally available under Linux and MacOSX so you only need to install the zsh Kernel for Jupyter, and then the sos-bash language module, which supports both bash and zsh.
One of the advantages of using a Jupyter notebook is the ability to access the notebook remotely. For example, you can start a Jupyter server from your office computer and connect to it from you home (as long as there is no firewall that blocks the assigned port).
The jupyter documentation provides detailed instructions on how to start a Jupyter notebook server that accepts external connection. Generally speaking, you should run command
>>> from notebook.auth import passwd
>>> passwd()
from a Python shell to get sha presentation of a password. Generate a new configuration file (~/.jupyter/jupyter_notebook_config.py) with command
jupyter notebook --generate-config
and modify it with lines such as
c.NotebookApp.ip = '*'
c.NotebookApp.password = u'sha1:...<your hashed password here>'
c.NotebookApp.open_browser = False
c.NotebookApp.port = 8888
Then, after you start your notebook server using command
jupyter notebook
You should be able to access it remotely with URL
http://url-or-ip-of-notebook-server:8888/
If you are using virtualenv or pipenv, you might need to remove the sos kernel installed globally with command
jupyter kernelspec remove sos
python -m sos_notebook.install
to install sos for the particular python interpreter of the virtual env.
Windows systems lack native support for some of the tools that SoS uses and it is generally more difficult to set up Jupyter kernels for different languages. We therefore do not recommend the use of SoS and SoS Notebook under windows for novice users.
The best way to use SoS under windows is to use a Linux subsystem. You could enable Linux subsystem for windows if you have a Windows 10 system with Developer Mode enabled, or use one of the Linux subsystems such as Cygwin, MinGW, or MSYS2. We generally recommend the use of MSYS2 because of its pacman package manage system.
To install MSYS2,
pacman -S openssh rsync git
c:\msys64\usr\bin (adapt to your installation) to environment variable $PATH so that commands rsync, rcp, ssh, and git are available to sos.Note that
git is optional especially if you already have git for windows installed (which is also based on msys2).$HOME properly to use ssh and public key authentication with other machines. This page provides a nice summary of the steps.
 Bash
Bash JavaScript
 Julia
Julia Lua
Lua MATLAB
 Octave
 Python 2
 Python 3
 R
R Ruby
Ruby SAS
SAS Scilab
 Stata
Stata TypeScript
 Zsh
Zsh